If you want to give your widgets a unique look and feel, you can edit the design of each widget.
Who can do this? By default, Designers.
Open the widget editor
-
Go to your dashboard.
-
Click the Pencil in the top-right corner of a widget.
This will take you to the widget editor.
Note: Alternatively, you can click Advanced Configuration when creating a new widget.
Tip: Watch our video on how to move widgets and make them responsive.
Change widget styling
Change the style of your widgets to make them look more modern or exactly how you want.
-
Go to your dashboard and find the widget you want to style.
-
Click the Pencil to edit the widget.
-
On the Design tab, go to Widget Style.
-
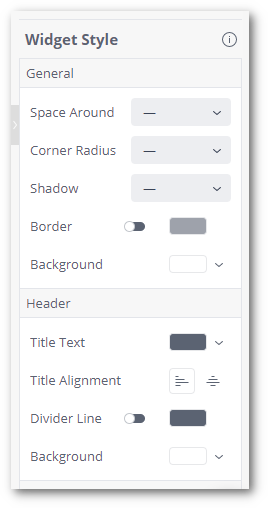
Configure the widget style options to your liking:
Space Around: The amount of empty space around the widget.
Corner Radius: The size of the corner radius of the widget.
Shadow: The darkness level of the drop shadow around the widget.
Border: A toggle to turn a widget border On/Off and what color it should be.
Background: The color of the widget background.
Title Text: The color of the widget title.
Title Alignment: The alignment of the widget title (Left-aligned, center-aligned).
Divider Line: A toggle to turn a widget header divider On/Off and what color it should be.
Background: The color of the widget header background.
-
Click Apply.
Change the color of a value
Assign a specific color to a data value that does not change.
-
Go to your dashboard and find the widget you want to style.
-
Click the Pencil to edit the widget.
-
Under Values in the left-hand panel, click the color picker for a value.
-
Select or enter your preferred color and click OK.
-
Click Apply.
Assign a range of colors
Assign a range of colors to a field according to its value.
-
Go to your dashboard and find the widget you want to style.
-
Click the Pencil to edit the widget.
-
Under Values in the left-hand panel, click the color picker.
-
Select the Range tab.
-
Select Manual to manually configure the color range, and then click OK.
-
Click Apply.
Define conditional colors
Define colors based on the value of the field as defined by a logical expression.
-
Go to your dashboard and find the widget you want to style.
-
Click the Pencil to edit the widget.
-
Under Values in the left-hand panel, click the color picker.
-
Select the Conditional tab.
-
Configure under what condition the color will display.
-
Select or enter your preferred color for each condition.
-
Click OK.
-
Click Apply.
See also