

This article explains how to configure Single Sign-On (SSO) between your Wazoku platform and Salesforce using SAML 2.0.
Once configured, users will be able to sign in to your platform using their Salesforce credentials.
Before You Start
In the examples below, yourdomain.wazoku.com is used as a sample domain. Replace this with your own platform URL.
Before configuring SSO, ensure that:
- You have System Administrator access in Salesforce
- Your Salesforce organisation has My Domain enabled
- You can access your platform’s SAML metadata file at:
https://yourdomain.wazoku.com/saml_ol/metadata.xml - You have permission to create and manage Connected Apps
Step 1: Enable My Domain
If My Domain is already enabled, you can skip this step.
Salesforce requires My Domain to be active before SAML can be configured.
- Log in to Salesforce as an administrator
- Open Setup
- Search for My Domain
- If My Domain is not enabled:
- Register a domain name
- Deploy it to users
Confirm that My Domain is active before continuing.
Step 2: Enable Salesforce as an Identity Provider
- In Setup, search for Identity Provider
- Select Identity Provider
- Click Enable Identity Provider
- Save your changes
Pay special attention to the trailing slash ‘/’ at the end of the Entity ID
Salesforce will generate a signing certificate automatically.
Step 3: Create a Connected App
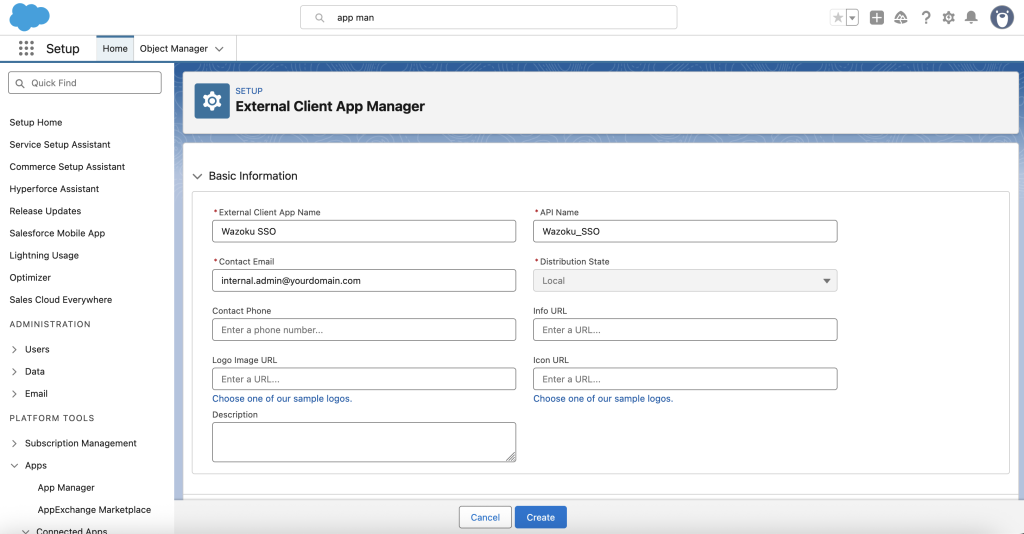
- In Setup, open App Manager
- Click New Connected App (or New External Client App)
- Enter the following details:
- Connected App Name
Example: Wazoku SSO - Contact Email
Administrator email address - Distribution State
Select Local
Enable SAML and save the Connected App.
Step 4: Configure SAML Settings
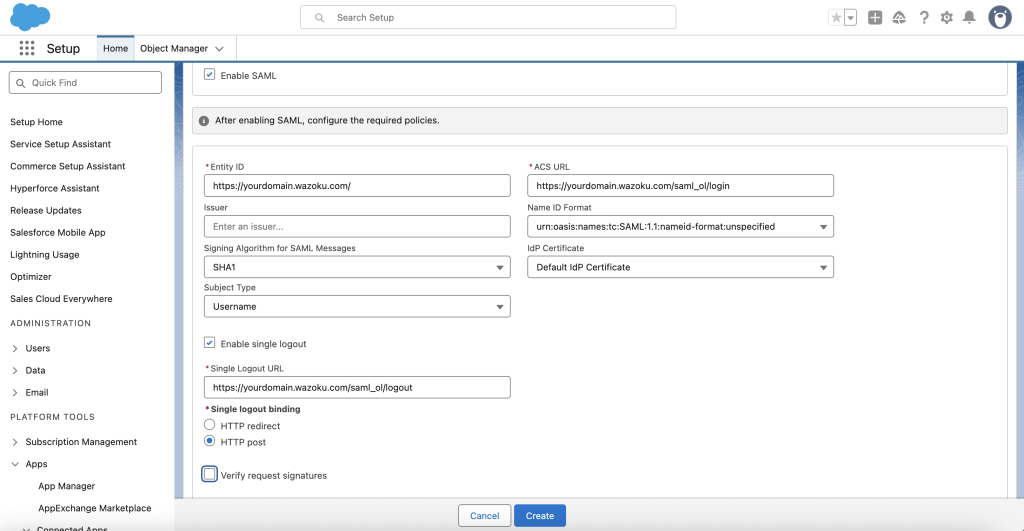
Salesforce does not support uploading Service Provider metadata. Values must be entered manually.
Enter the following:
Configure:
- Name ID Format: Unspecified
- Subject Type: Username
(Optional) To enable Single Logout:
- Single Logout Service URL
https://yourdomain.wazoku.com/saml_ol/logout - Single Logout Service Binding: HTTP POST
Save the Connected App.
Ensure the Entity ID includes the trailing slash (/).
Step 5: Assign Users
Users must be granted access to the Connected App.
- Open the Connected App
- Go to Manage
You may assign access using:
- Profiles, or
- Permission Sets (recommended)
Step 6: Configure Custom Attributes
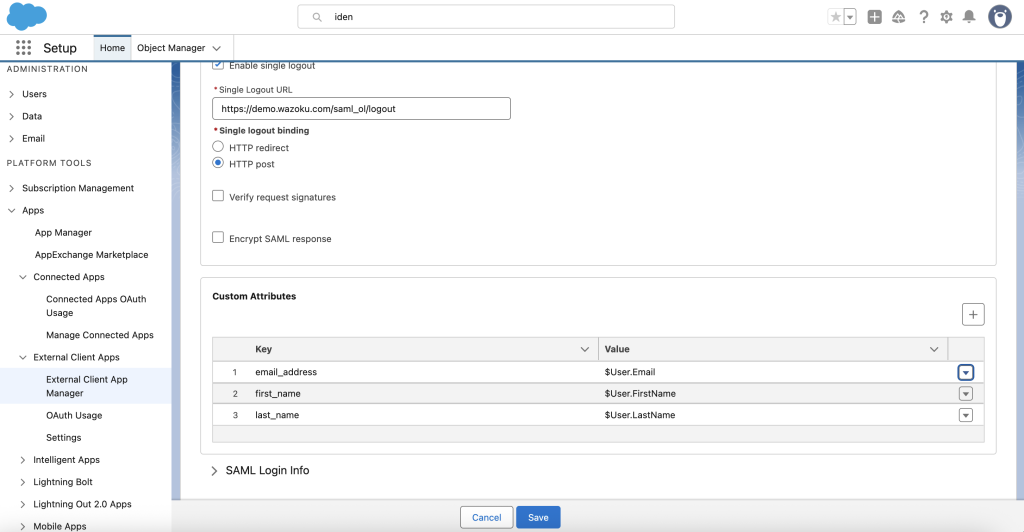
Add the following Custom Attributes:
- email_address → User.Email
- first_name → User.FirstName
- last_name → User.LastName
Save the configuration.
Step 7: Download Identity Provider Metadata
- In Setup, open Identity Provider
- Download the IdP Metadata XML file
Send the following to support@wazoku.com:
- IdP Metadata XML file
- Confirmation that User.Email is used as the identifier
- Your platform URL
Wazoku will complete the configuration on your platform.
Step 8: Test Single Sign-On
Once Wazoku confirms setup is complete:
- Open your platform login page
- Select Sign in with SSO
- Authenticate using Salesforce credentials